The Xmerge coding library provides useful functions to manipulate dates. We use it a lot when working with our clients, and we’d like to share some useful operations that might be useful to you as well.
In this article, you will understand how date formatting in XMerge works and learn how to choose between different available character codes to correctly display a date attribute in your document. By using some of these techniques, you can make your documents look attractive and unique to clients. Having a consistency of approach can also make supporting your documents a lot easier for your support team. This all leads to happier clients and more professional looking documents.
1. Datetime_merge: current Date and Time of when your document is generated
With XMerge you can quickly insert the current date (and time) into the body of a document as well as into the header and footer. If you want the date to automatically update when you merge your document template you need to use the datetime_merge object into your template; this will help eliminate the tedious chore of manually deleting prior dates every time you merge your document.
The basic Xmerge syntax to print the date and time object is as follows:
<:=datetime_merge:>
Sample output:
04/02/2018 10:31:23 am
However, if you want to display the date without the time or to display the date in a different format, for example (“4 Feb 2018” instead of “04/02/2018”), Xmerge also provides a variety of pre-defined formats. In the next section we’ll show you how to use and combine them to suit any business communications objective.
2. Format: create the date format that suits your business communications
The datetime_merge object provides a convenient method called format to handle the date formatting. Using it allows you to create a string representing the date and time. This is done by using various codes that let you control how the date looks after conversion.
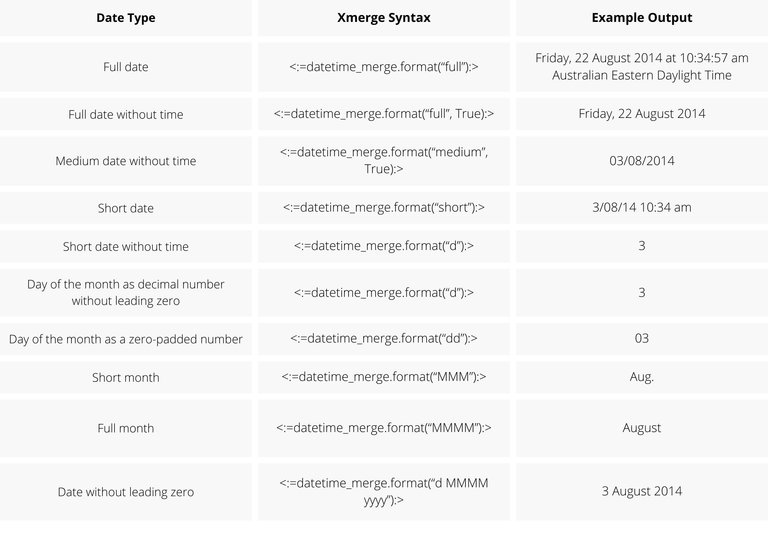
Here are a few common examples of character strings and their equivalent outputs (available from the IRESS template library):

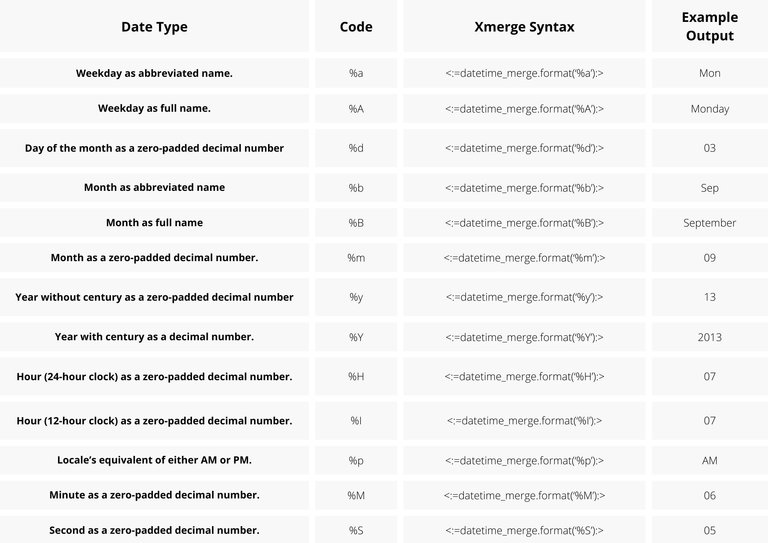
While the table above shows common examples of pre-defined character strings that were built by IRESS, the table below shows the individual Character Codes that you can use to create your own date format string.

Those character codes can also be put together to form a character string. Below is an example of how to combine them to suit your needs:

The great part is that the format method can be used with any Date field (standard and custom fields), not just with the datetime_merge object.
Here is a list of Date fields that you may be using in your documents you may wish to apply some formatting to:
- SoA Date
- Meeting date
- FSG version Date
- Date of FSG provided
- Date of Birth
- Date of Will
Let’s look into an example. Suppose you have created a custom field called “Date of SOA” that displays on the cover page of your Statement of Advice document. By default if no formatting is applied the date of SOA displays in its short form e.g 03/08/2017.

Now if you wanted to change the format you would simply apply the format function to the Date field as previously described. This allows to control the formatting with an explicit format string as follows:


Summary
- Use datetime_merge object to pull through the current date and time of when the document is generated.
- In conjunction to the above use the format function to provides a way to express the date and time in a variety of formats effectively.
- You can choose between pre-built date time format or define your own character string format that suit your style
At PlanFocus, we create unique hand-crafted XPLAN sites that deliver your advice brand and use XPLAN to its full potential. If you would like help with formatting dates with XMERGE or want to learn more about our services, please get in touch.

