

Composer | User Training Material
Introduction
Advice Composer is an advice wizard which has been designed as a goal-centric, multi-entity, scenario based advice framework. Integrating with IPS (IRESS Portfolio System), Risk Researcher, WealthSolver and Xtools+ the framework supports the following advice types:
Comprehensive Statement of Advice (SOA), Record of Advice (ROA), Risk only advice, Strategy only advice and SMSF advice.
Goals based
Advice Composer helps clients understand the link between the advice provided and the objective the advice is designed to meet. To this end, strategies are linked to goals and objectives, allowing the adviser to control the order in which strategies and objectives are grouped within the advice document. Iconography makes it easy for clients to locate their goals and feel connected to your advice.
XPLAN best practice design
Advice Composer has been designed for using all of XPLAN’s functions and features enabling practices with large teams and small to maximise the value of their XPLAN licenses.
Fact Finding
Complete your fact find. The Persona fact find has been designed to integrate directly with the advice wizard ensuring that effort in data entry is not duplicated and time is not wasted.
Advice Request
The Advice Request wizard has been designed to plug the gap between the fact find and the Statement of Advice. It has been designed to allow advisers demonstrate their thinking surrounding the strategy development that has occurred following the completion of the client fact find, but prior to the SOA. Advice Request wizard integrates directly with the Advice wizard ensuring data entry is not duplicated.
Modelling
Advice Composer integrates with all XPLAN’s key modelling tools. Modelling completed by the adviser or other users can be preplanned, then link to the Advice Request wizard or directly to Advice Composer. This allows teams to complete modelling scenarios without needing to go through the advice wizard process first. Staff can complete modelling scenarios in parallel while other staff are completing other advice tasks for the same client.
Benefits:
Allows your team to access all functions of modules rather than the limited set of functions available through embedding each modelling module within the wizard
Supports the creation of several models and projections to pull through the most appropriate modelling within the advice scenario.
Staff can work in parallel on modelling the same client and advice case without everyone trying to be inside the advice wizard at the same time. This is a more streamlined and productive experience for all your staff and it reduces the time needed to complete an advice document.
Advice production staff navigate the advice wizard, selecting the modelling scenarios created by staff over the course of the day.
Advice Composer strategy library consists of about 150 different advice strategies that can be selected and adjusted directly in the wizard for your client. More details in the Strategy Recommendations section.
–
Getting started
To begin an advice scenario, select a client and navigate to the advice wizard.
Scenario index screen
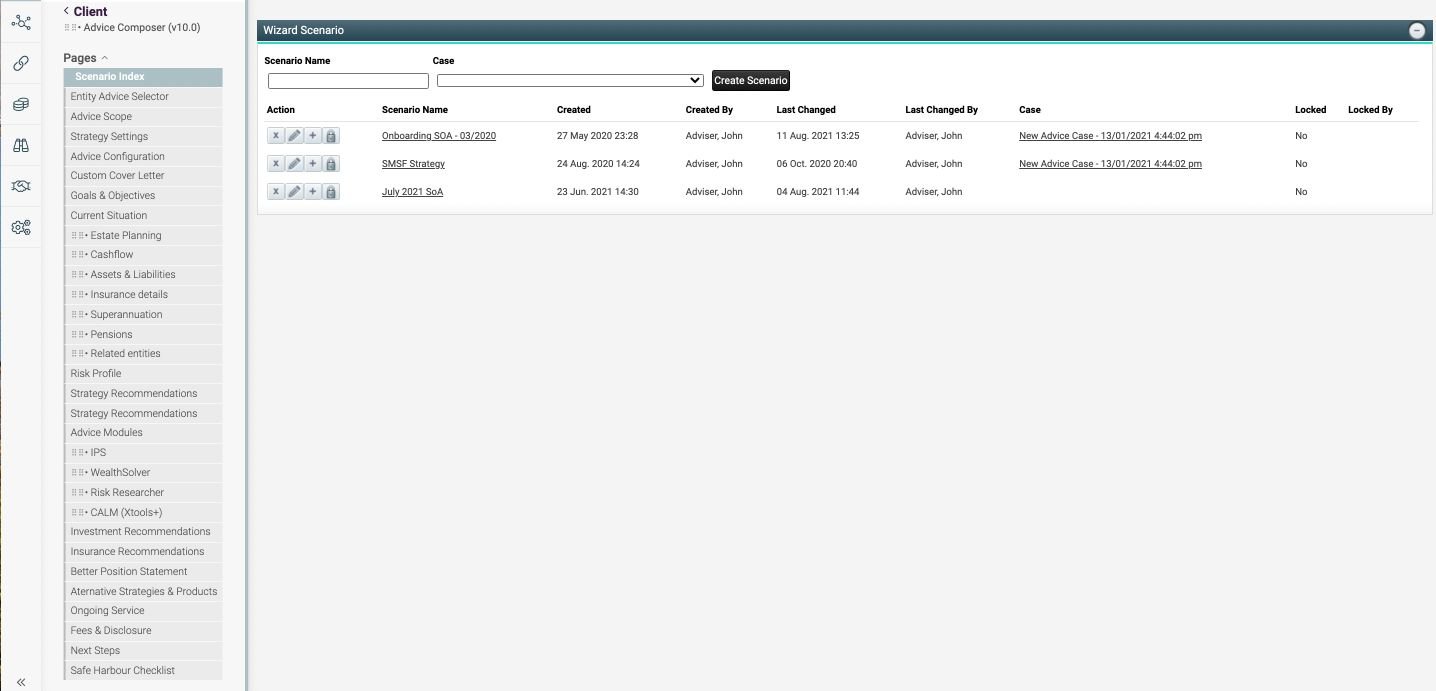
The scenario feature saves all the settings and options you chose during any specific advice journey. Each time you open the wizard you have the option to open an existing scenario and continue working on the wizard, start a new scenario or take an existing scenario and ‘save as’ and create an alternative version based on this scenario.
Note: Any scenario created via the Advice Request wizard will be listed. Our recommendation is to create a copy of the Advice Request scenario by clicking ‘save as’ (the + icon) that will form the baseline for your advice.
Try it: Open an existing scenario or start a new one. The Entity Advice Selector screen displays.
On the left hand side there are a number of pages which you will work you way through by clicking the Next button. Every time you select Next, any information you’ve added on screen will be saved. If you select Save & Exit it will save the information and will exit out of the wizard, back to the client record.
Entity Advice Selector screen
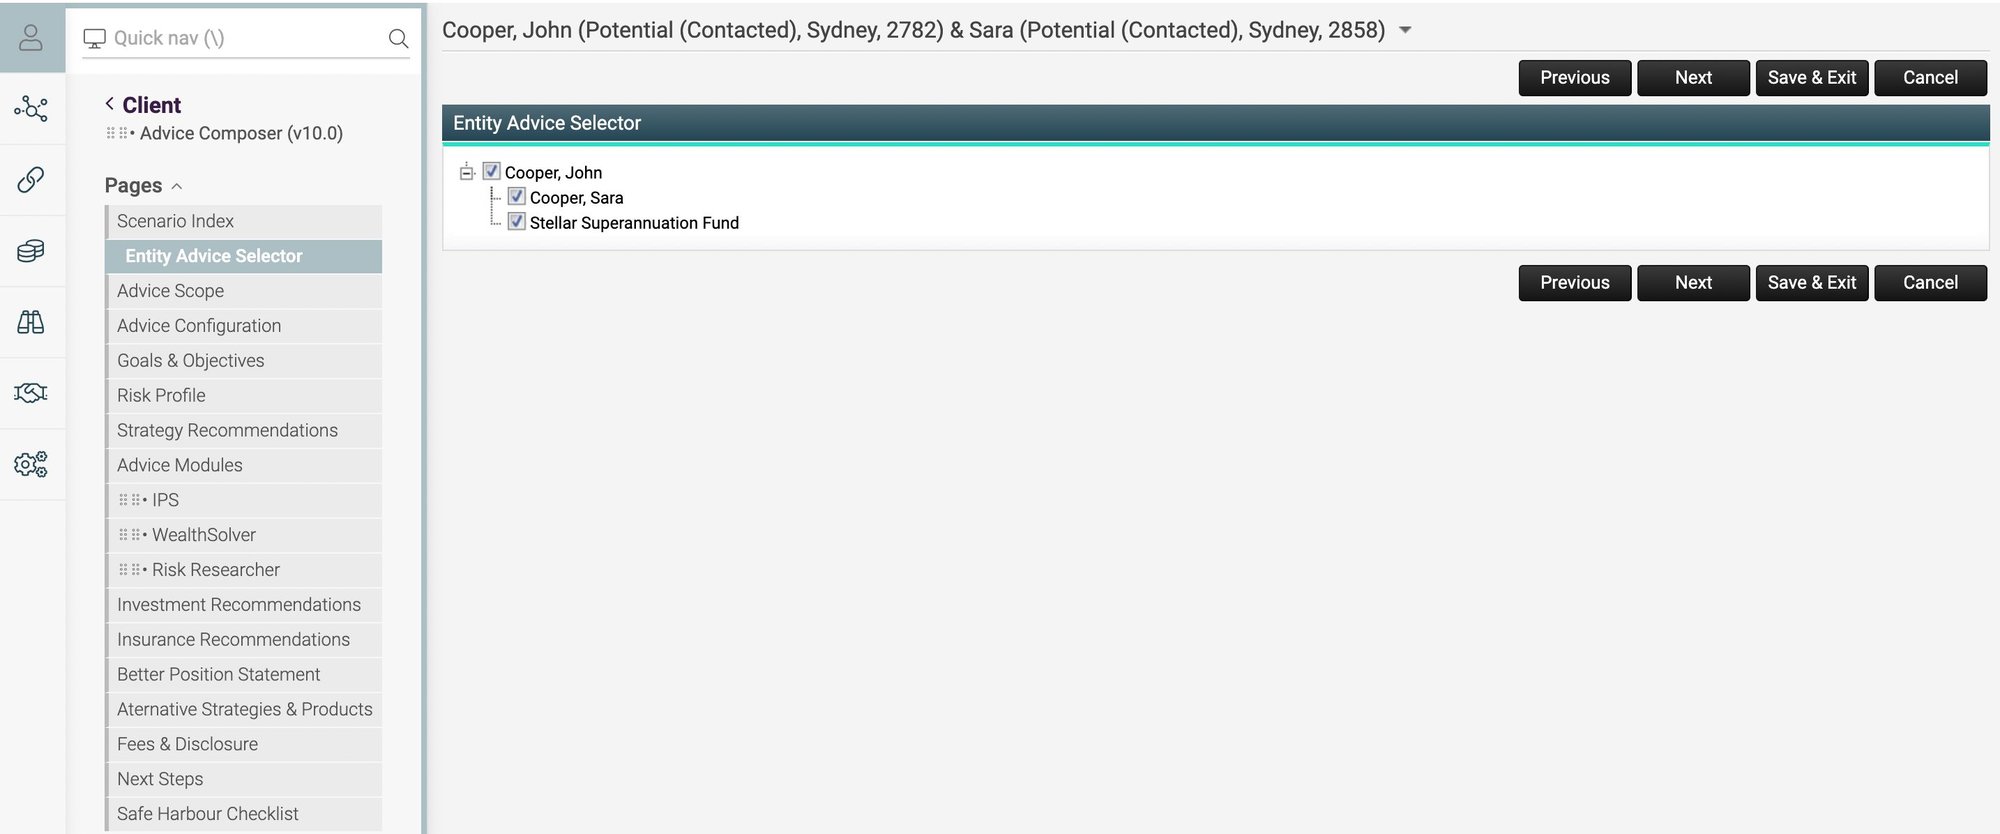
Most advice wizards ask the generic question, “Is this advice for client, partner or other entity?” For clients with complex entity structures, this can be a little vague. Advice Composer supports the selection of the exact entities to be included in your advice.
Try it: Select the entity to be included in this advice then click Next. The Scope of Advice screen displays.
At least client or partner entity must be selected on the Entity Advice Selector screen for the advice document to generate successfully.
Scope of advice
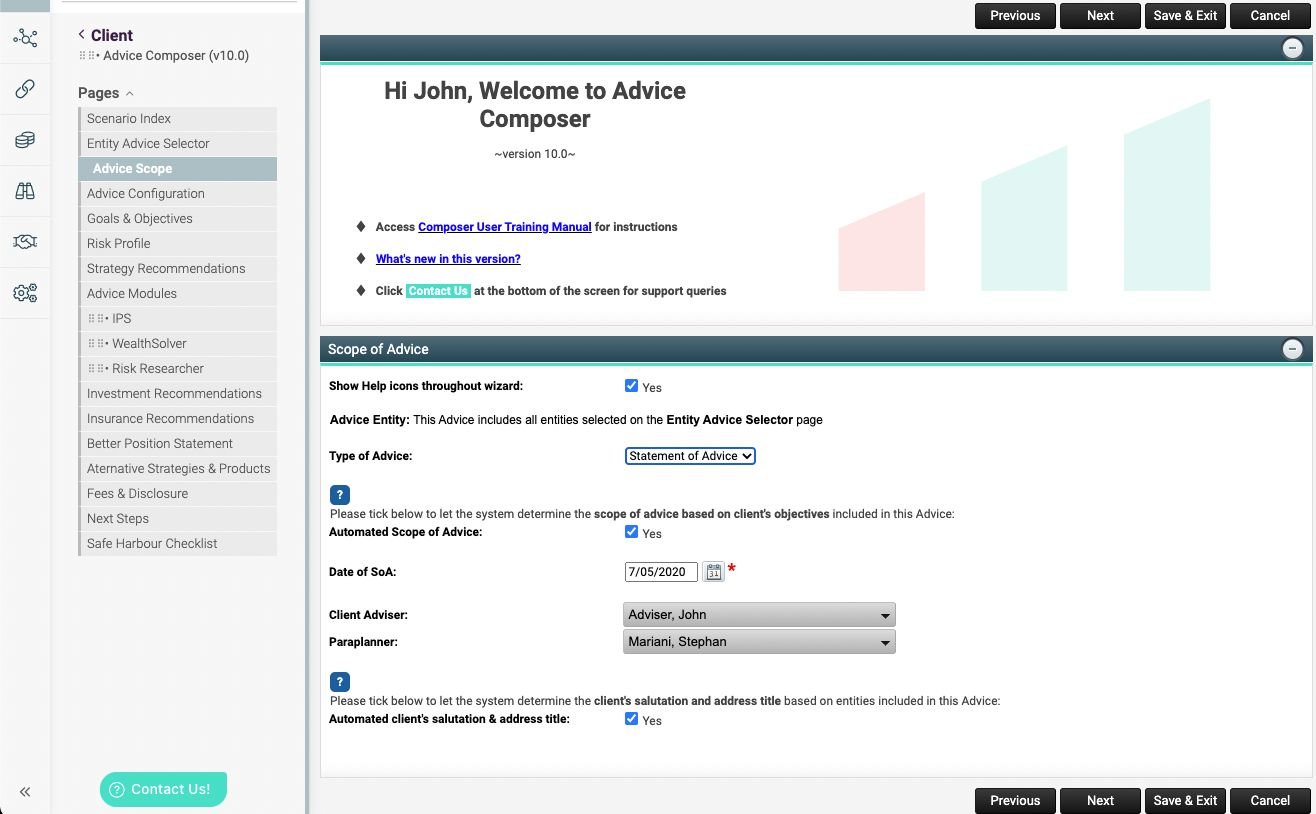
The Scope of Advice screen sets the subject matter for the advice being given.
Advice Entity: Defined by the entity selector on the previous screen
Type of Advice: Options include
Statement of advice, Strategy Only, Risk Only, Record of Advice
Automated Scope of Advice: Set check box to on if you would like the scope of advice to be sourced from the client objectives captured in the fact find
Deselect checkbox to manually select scope of advice items.
Automated client’s salutation & address title: Set check box to on if you would like to let Advice Composer to format the salutation and address title based on what you have selected on the Entity Advice Selector.
When you deselect the checkbox you must enter or confirm the Salutation and Address Title.
A goals based scope of advice is driven by your client’s objectives. If you choose ‘Automated Scope of Advice’ you must ensure that:
client objectives are set with the correct categories and objectives are set to “in-scope” for the advice
–
Advice Configuration
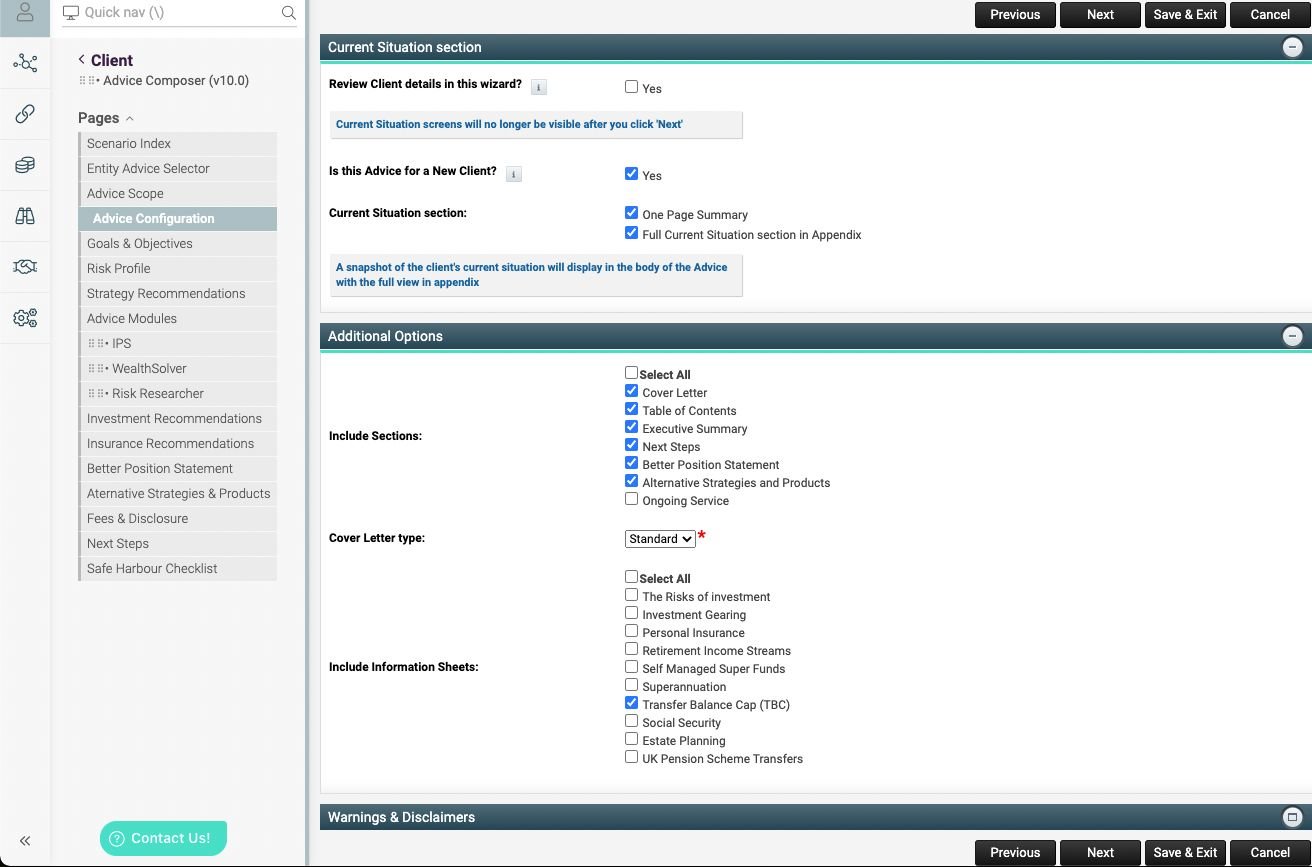
Current situation section
Clicking Yes to Review Client details in this wizard if you would like to see all the client situation screens. Otherwise they will be removed from the menu to save you time.
Is this SOA for a new client? this option will drive the content of the cover letter should your cover letter cater for new clients and existing clients.
If you would like the client situation to appear as a summary in the document body, choose, One Page Summary in Current Situation Section.
As an alternative or in addition, select Full Current Situation section in the Appendix if you prefer to see these tables at the end of the advice document
Include Sections
Selecting items in this list will add them to the advice document and add relevant screens to the navigational menu.
Cover Letter Type
Choosing Custom will present a rich text editor on the next screen where you can type (or paste) your own custom cover letter. The standard letter will be replaced with what you type in this area.
Include Information Sheets
Choose the information sheets you would like to include in the as appendix at the end of your advice document.
Warnings & disclaimers
Select option in accordance to any restrictions on the advice you offer, and any disclaimers you would like to include.
–
Client objectives
Goals & Objectives screen
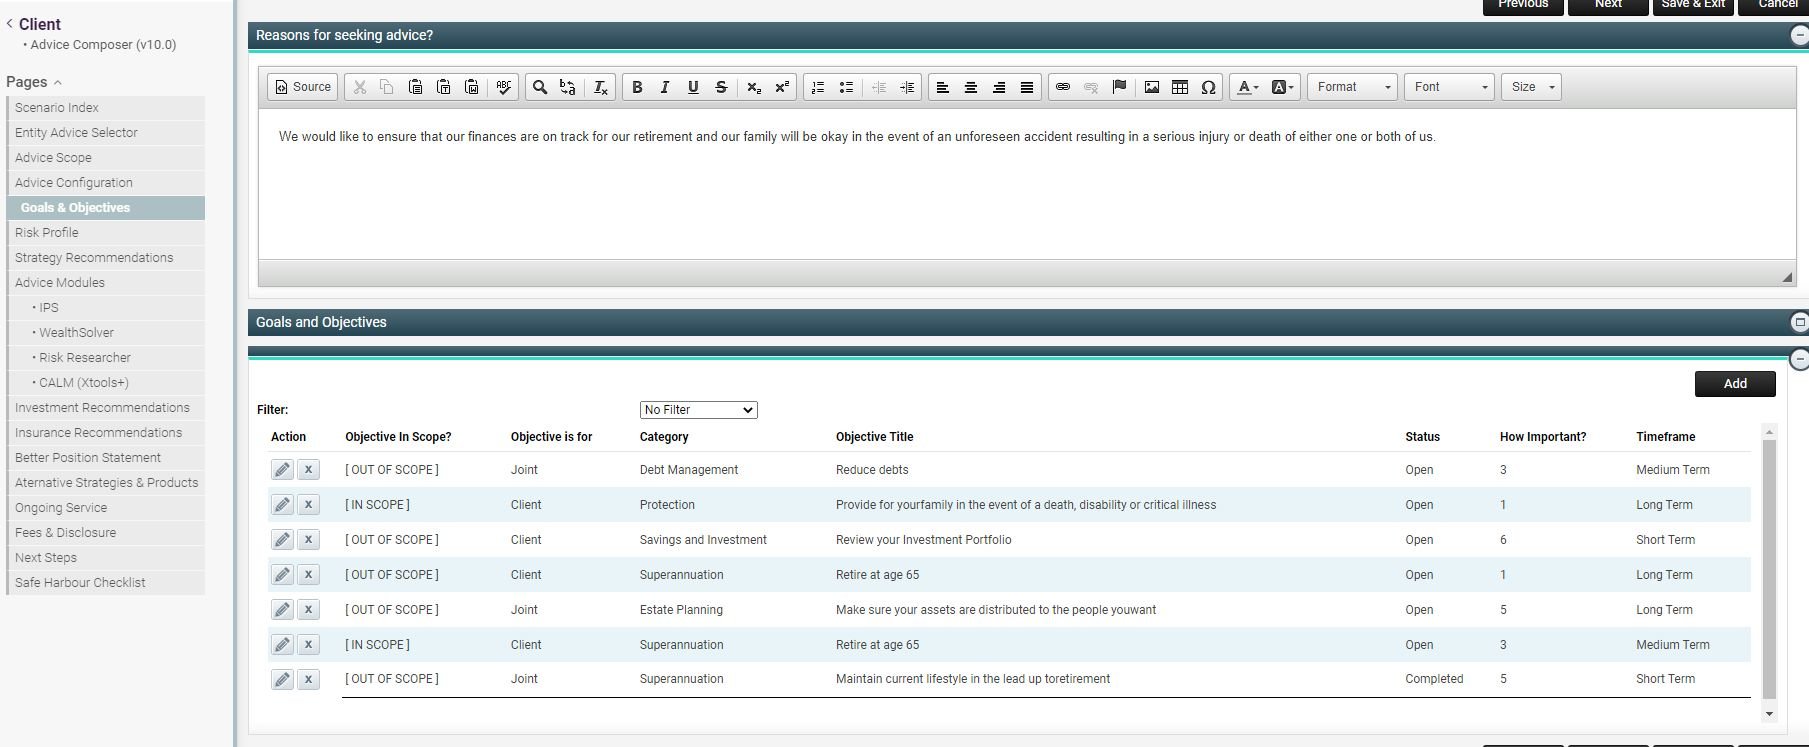
Sourced from the fact find, the information entered in Client Objectives will drive:
1 – The scope of advice and therefore the sections which will appear in your advice document
2 – The strategies and modelling output of your advice
Review the objectives from the fact find. These can be added to or modified from this page. To include an objective in this advice make sure you have set the In Scope? field to [ IN SCOPE].
Adding a new objective to your advice
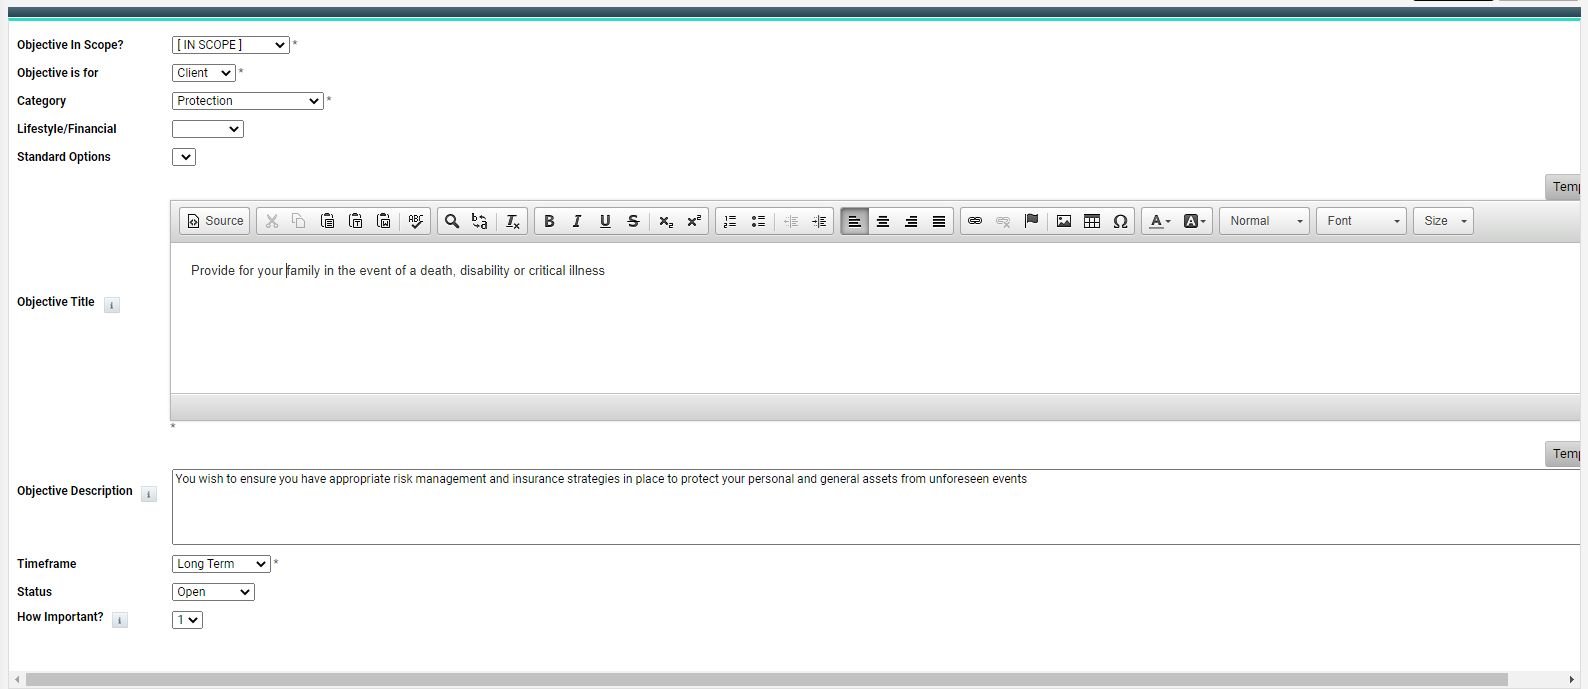
While creating a new objective you must ensure that the following parameters have been correctly configured as they will directly affect the structure and output of your advice document:
In Scope? Select [ IN SCOPE ] to include the objective to your advice. Select [ OUT OF SCOPE ] if the advice to be provided does not cover this specific objective
Owner: Who is this objective for? [client, partner or joint]
Objective Type: If you have selected Automated Scope of Advice on the Scope of Advice screen then the objective type (or category) will drive the scope of your advice. e.g if you add an objective with a type of retirement and it is set as [ IN SCOPE ] then Retirement Planning will be entered as part of the scope of advice.
Note: This is an important step. The scope of advice drives the overall structure of the advice document so it is crucial to select the most relevant category for each objective
Objective Title: Summary of the client objective
Description: Additional details about client objective, timeframe, short term, medium term, long term
Status: Open, Completed or Cancelled
Note: Only objectives with a status of Open are included in the scope of advice
Priority: A number set between 1 to 9 corresponds to the following:
1: Very High
2: High
3: Moderate
4: Low
5+: Very Low
–
Client details
Client details screen
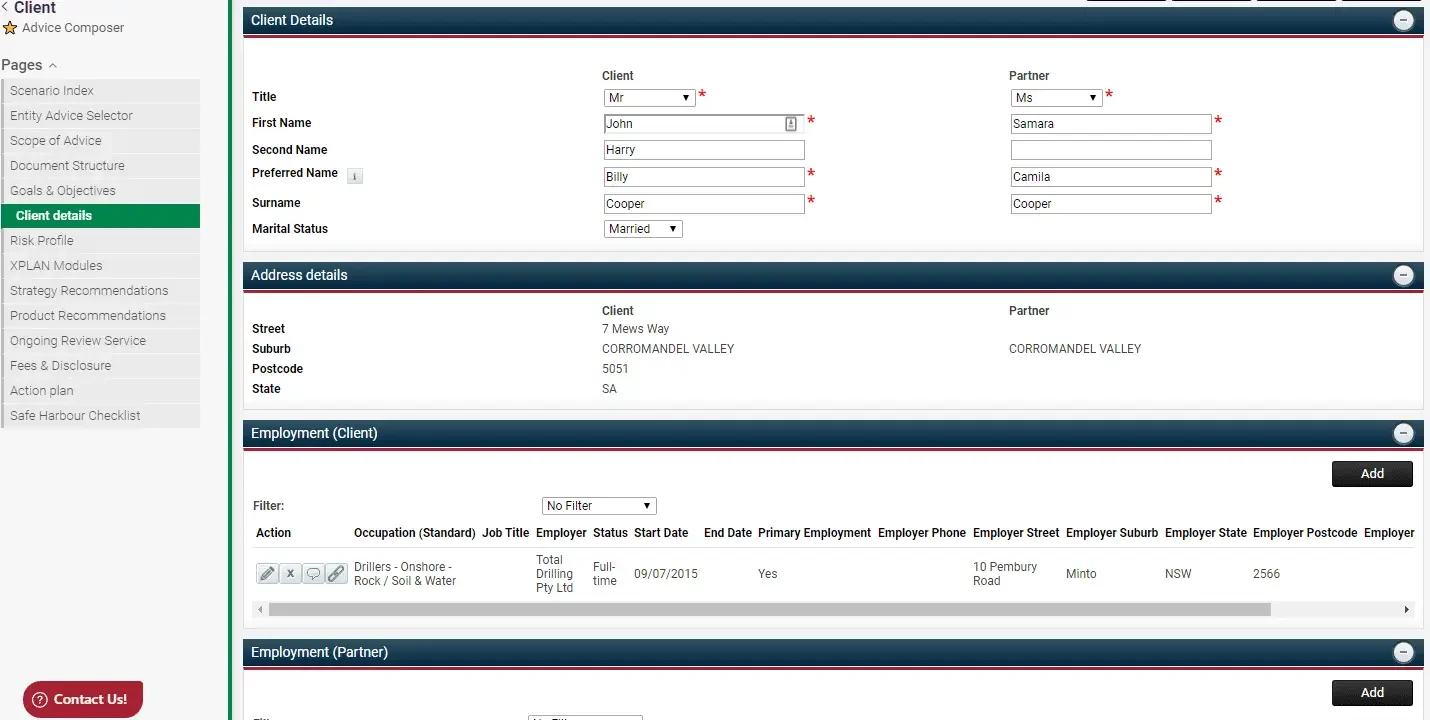
The Client Details screen contains the personal details field groups you are likely to find in the fact find and client focus in XPLAN such as:
Basic details, address details, dependants, employment, estate planning
Note: To update the financial and insurance details please navigate through to the CRM. Reviewing these details is an important step in the process.
Risk profile screen
The client risk profile details contain all the standard risk profile elements from XPLAN. A review of this detail is an important step in the process.
Investor Profile Toggle: Use the Investor Profile Toggle to switch from displaying the client’s risk profile and the Client Group risk profile.
Investor Risk Profile: Confirm profile to be selected
Update Target from Risk Profile: Clicking this button will modify the client target with the settings set against the selected risk profile set in admin.
Update Target from Risk Profile: If you choose, edit the risk profile targets to a custom risk profile target
Variance to Risk Profile
If you and or your client has chosen to vary the target asset allocation of their risk profile, click Yes and enter your reasons and justifications for the variation

Strategy recommendations
Strategy recommendations screen
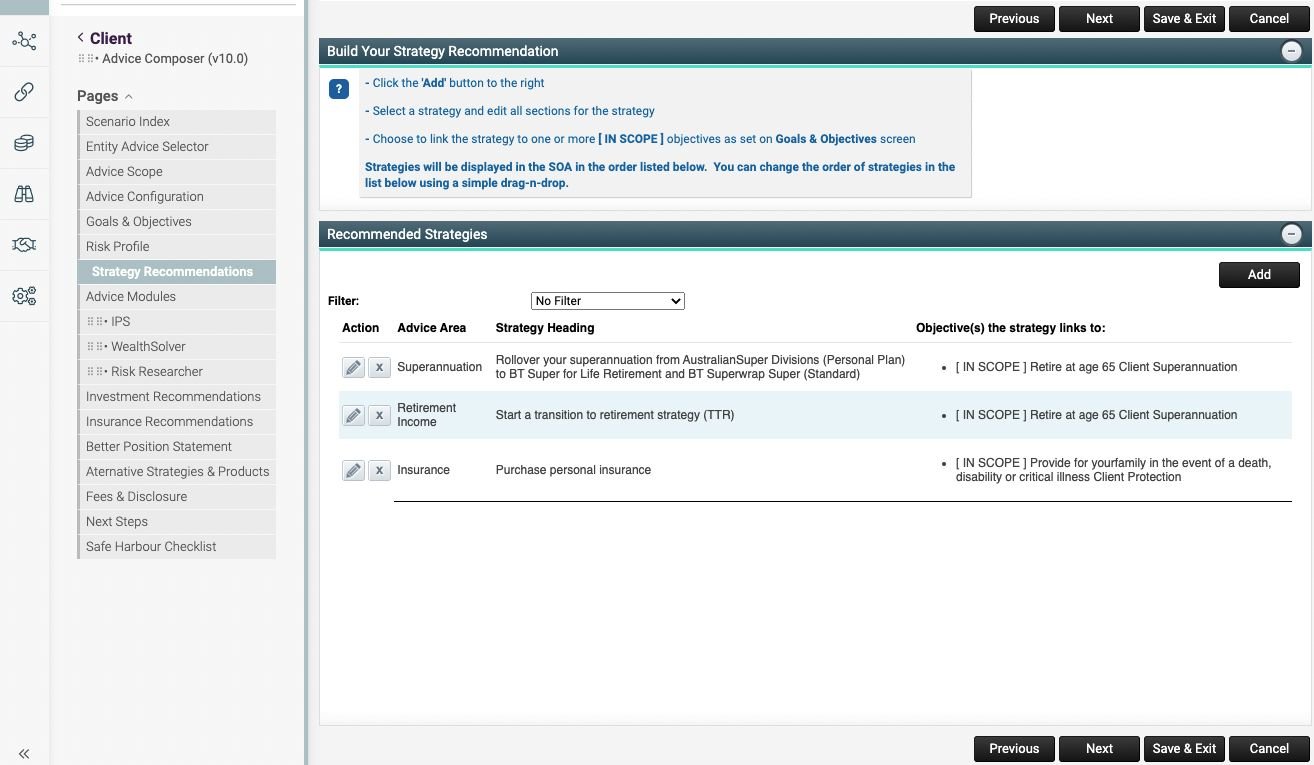
Recommended Strategies: Click the Add button to link a strategy to the in scope objectives. This is explained further under “Selecting a Strategy”
Recommending a strategy
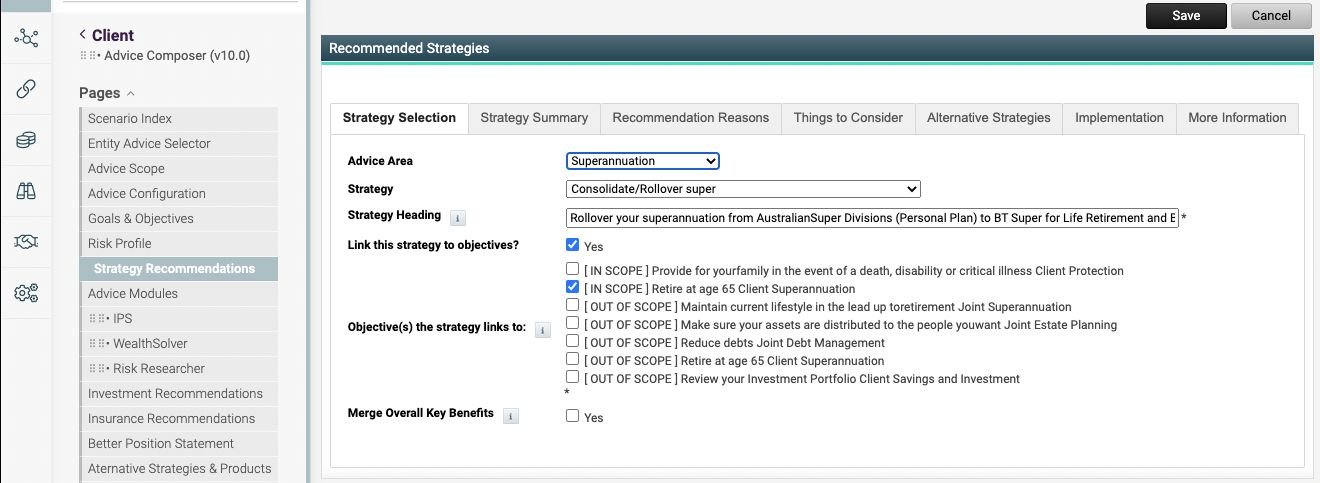
Advice Area: Select the area of advice you would like to source the strategy text from. Currently the strategy library contains in excess of 155 strategies available under the following advice areas:
Aged care, Business insurance, Cash, Debt Management, Estate Planning, Insurance, Investment, Retirement income, Self-Managed Super Fund, Social security, Superannuation, Taxation, Covid, Custom.
Any licensee specific strategies can be integrated under the Custom area upon request.
Note: Planfocus regularly conducts comprehensive reviews of the strategy library to ensure strategies remain current; this includes rates and thresholds updates.
Strategy: Upon selecting a strategy, all text fields within the tabs pre-populate with the strategy content, where applicable.
Strategy Heading: Enter/modify the title for your strategy. This will appear in your SOA.
Advice Composer will automatically prefix the strategy heading with the strategy owner name in your SOA. e.g: “Bill, apply for a new life and TPD insurance policy”
Objective(s) the strategy links to. If you choose to link your strategy to one or more objective(s) that this strategy is designed to meet, please ensure you have selected in-scope objectives only.
Advice Composer strategy library gives you access to more than 150 strategy fragments for your client. The content is grouped into several freeform text sections. The main strategy content is spit into the following sections:
Strategy summary, How strategy meets client’s objective(s), Reasons for My recommendation, Things to Consider
Other freeform text section can be populated such as:
Overall Key Benefits (this will flow through to the Executive Summary), Alternative Strategies, Implementation, More information
Freeform strategy text
Freeform text is predominantly un-coded (or may contains a small amount of coding). It provides editable access to the strategy content directly in the wizard. Your team can modify the content within the wizard negating the need to modify it post output (merge). This can save considerable time editing the document post merge. It also ensures a copy of the strategy content is saved in XPLAN and not just saved inside the final document.
Tip
The code snippets placed into the strategy library will save you editing time. Try to leave them unchanged. For example, <:=I_We:> switches the sentence from starting with (I) to starting with (We) dependant on whether the client adviser is an individual AR (I), or a Corporate AR (We).
As not all text is relevant in every client scenario, best practice is to:-
1 – Browse each section of the content adding any commentary to the strategies to personalise it to your client’s situation
2 – Edit out comments that you do not require.
To help you with this task we have colour coded the content.
Black content – Please review and change if needed
Red Content – Must be modified to suit client
Reordering Recommended Strategies
The order in which your strategies appear in your advice document is the same as they appear within the Recommended Strategies screen. You can reorder the list of strategies by simply dragging and dropping the strategies into your preferred order.
Try it: Click and hold your mouse on the strategy to be moved. Then drag it up or down to its new location.
Only strategies designed to meet client objectives will be displayed in your advice. You must ensure that recommended strategies are linked to at least, one [IN-SCOPE] objective.
–
Advice Modules
XPLAN Modules screen
Increasing the value you get out of XPLAN is easier when you can integrate XPLAN’s various modelling modules into your advice document. The Planfocus wizard integrates with each of the key modules with all the latest illustration options.
Note: Modelling is designed to be conducted prior to using the advice wizard. This demarkation of the process ensures that different team members can be working on a client advice case concurrently which is a much more efficient use of your team’s time.
To integrate previously created modelling scenarios, select the appropriate modelling tools you sourcing the output from.
Note: if you are selecting a module you do not have access to, the system will display a warning message as you will not be able to pull relevant outputs without have appropriate license attached to your XPLAN login.
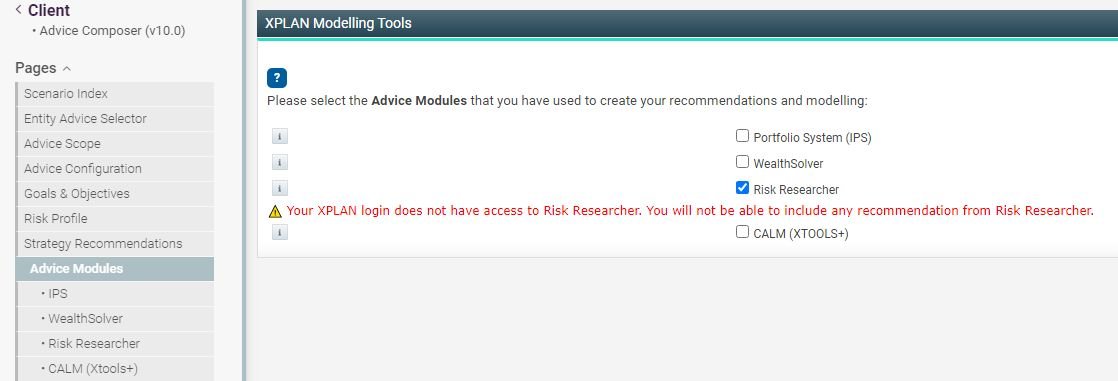
IPS screen
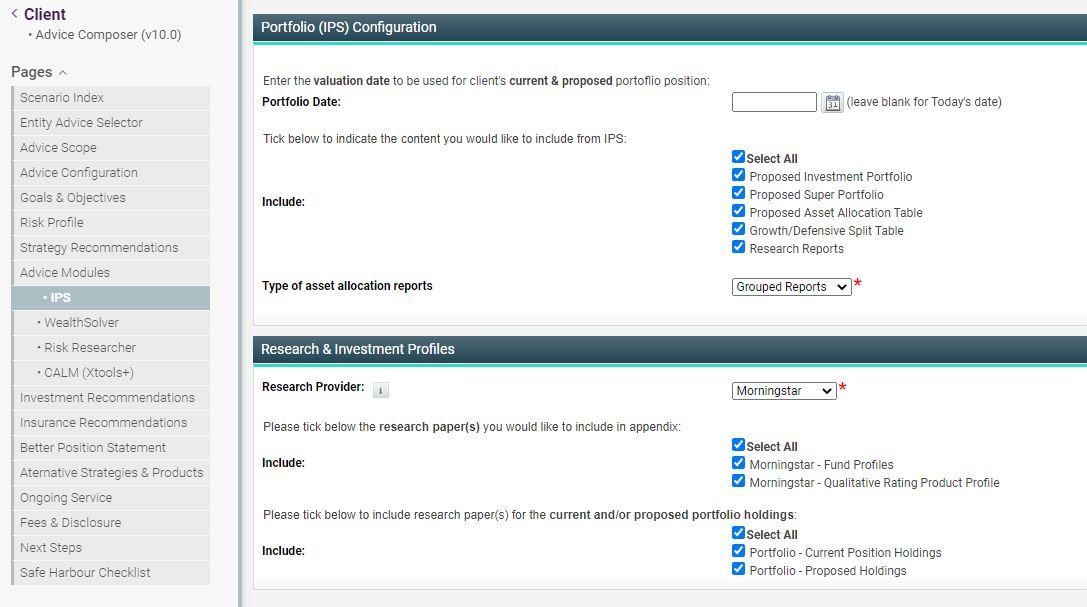
Portfolio Date: If you would like to use an earlier date for the portfolio valuation then enter a date, alternatively leave this field blank and by default the system will use today’s date
IPS Content inclusions: Use this setting to include specific content pages from IPS.
1 – Any IPS account that is set to Super Accumulation, Pension or Super Drawdown is considered a superannuation account. Select Proposed Super Portfolio to allow the recommendations to flow through for those accounts.
2 – For non-super investments, select Proposed Investment Portfolio.
IPS how to training videos
Note you must have an IRESS communities password
WealthSolver screen
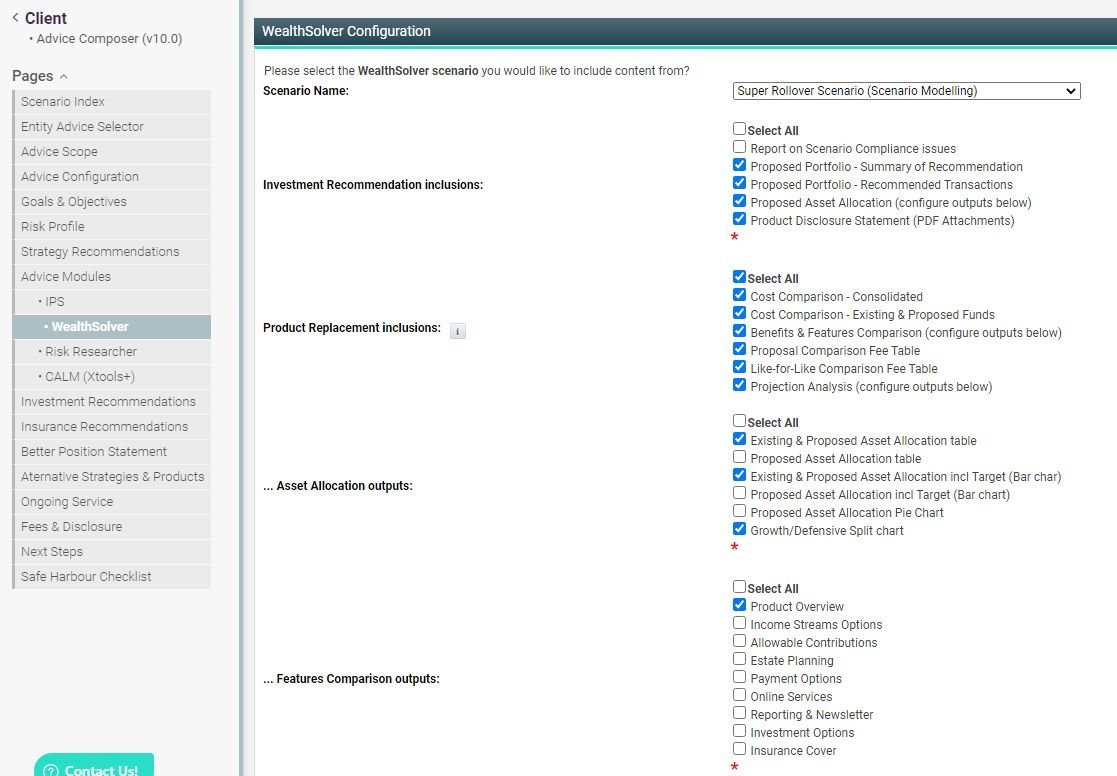
Scenario Name: Select the WealthSolver scenario created previously
WealthSolver Content inclusions: Use this setting to include specific content pages from WealthSolver.
A WealthSolver proposal must have the status RECOMMEND AND ACQUIRE to be included in your advice document
Note you must have an IRESS communities password
Risk Researcher screen
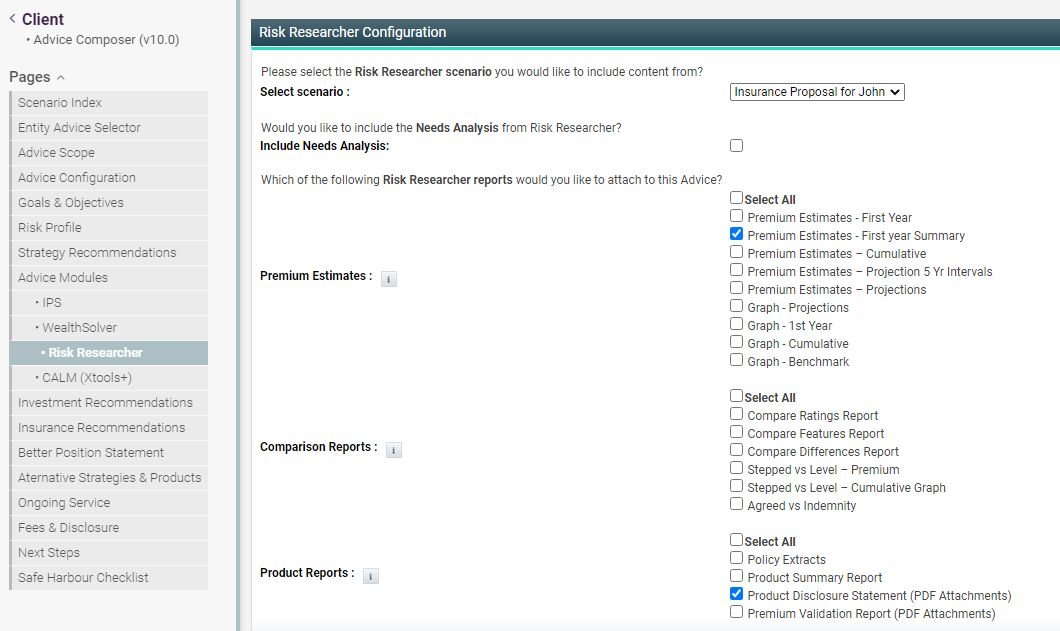
Scenario Name: Select the Risk Researcher scenario created previously.
Risk Researcher Content inclusions: Use this setting to include specific content pages from Risk Researcher.
Note you must have an IRESS communities password
CALM/XTOOL+ screen
From this page, link any Calm (Xtools+) financial projections to your SOA. This will enable your financial projections to include illustrations, diagrams and charts from within XPLAN’s vast library of report outputs.
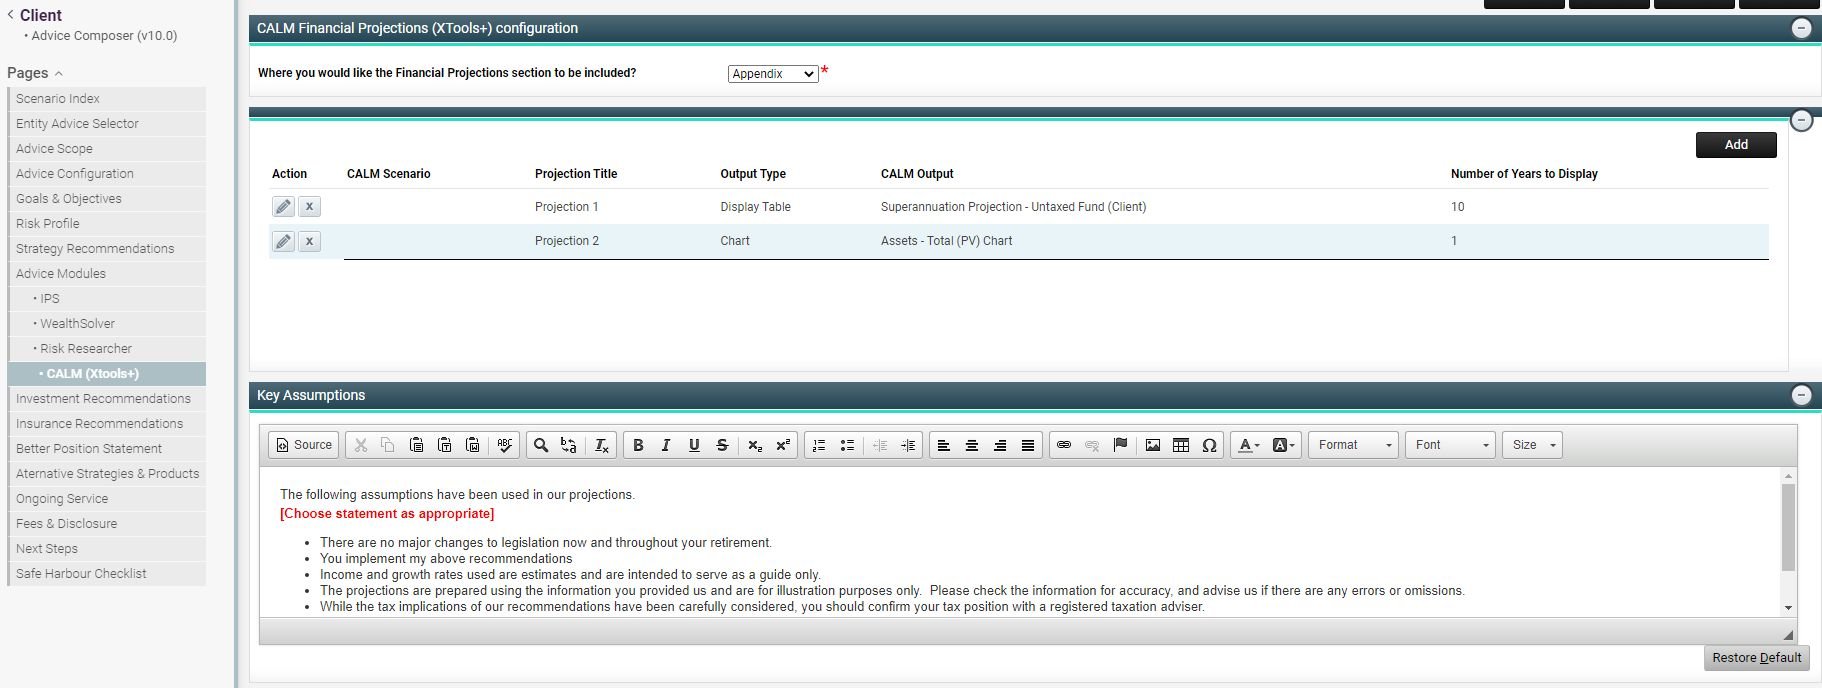
On the CALM screen you are able to select which Xtools+ (CALM) output you would like to produce. If you want to produce more than one result, simply add each output separately to the group. When adding an output you will need to complete the following fields:
CALM Scenario: Choose the scenario containing the modelling output you desire.
Output Type: Are you trying to produce a table, a chart or a list of assumptions?
Page Orientation: Do you want to display the modelling in portrait or landscape style?
CALM Page: Which CALM output page are you trying to display?
Show all periods: Do you want to display all periods in the chosen projection?
Display Start: Do you want to show details from the first year of the projection or do you want to start at the retirement year? If you have chose to show all periods this field will not be applicable.
Number of years to display: How many years would you like to display from your chosen starting point? If you have chose to show all periods this field will not be applicable
–
Investment recommendations
Investment recommendations screen
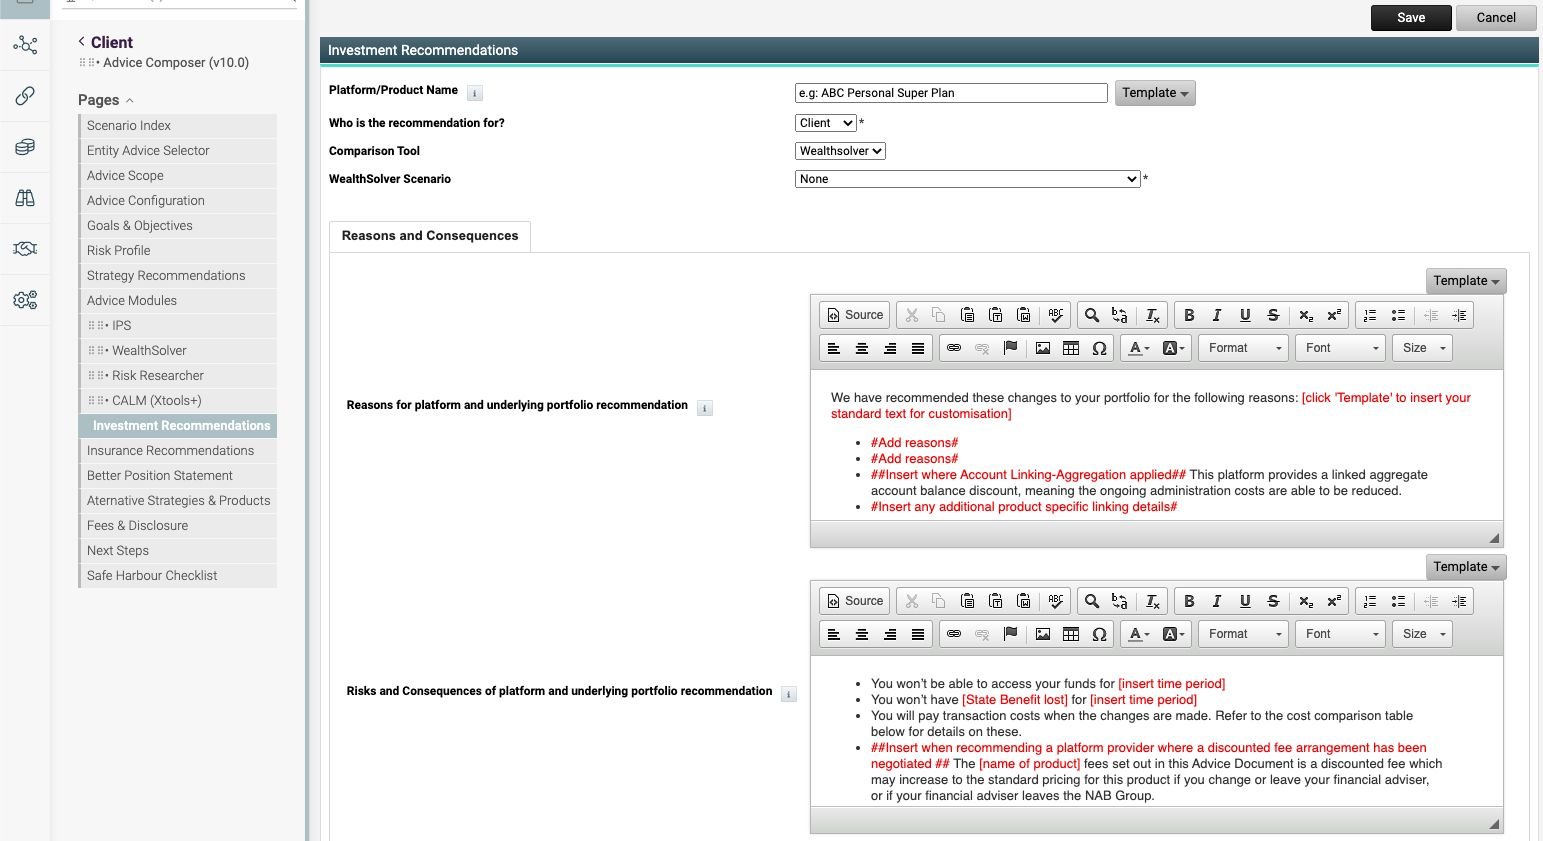
Platform/Product Name: Select from any Investment narrative stored in your document library
Who is the recommendation for? Select from Client, Partner, Joint or Other. If Other search for that entity
Comparison Tool? Decide where you are sourcing your comparison information from. Select from WealthSolver or IPS
WealthSolver Scenario: If you chose WealthSolver, select the scenario that you created to illustrate the comparison. Proposals with status “Recommend and Acquire” as well as “Like for Like” will be included.
Reasons and Consequences
Reasons for platform and underlying portfolio recommendation: Use the default text as a guide to start writing your reasons. If you have a predefined set of content, select Template and load the template text from your document library.
Risks and Consequences of platform and underlying portfolio recommendation: Use the default text as a guide to start writing your risks and consequences. If you have a predefined set of content, select Template and load the template text from your document library.
Click Save when done.
By using this method you can create and compare multiple modelling scenarios within your advice.
Just like the strategy recommendations page, you can re-order the comparisons using the drop and drag method with your mouse.
–
Insurance Recommendations
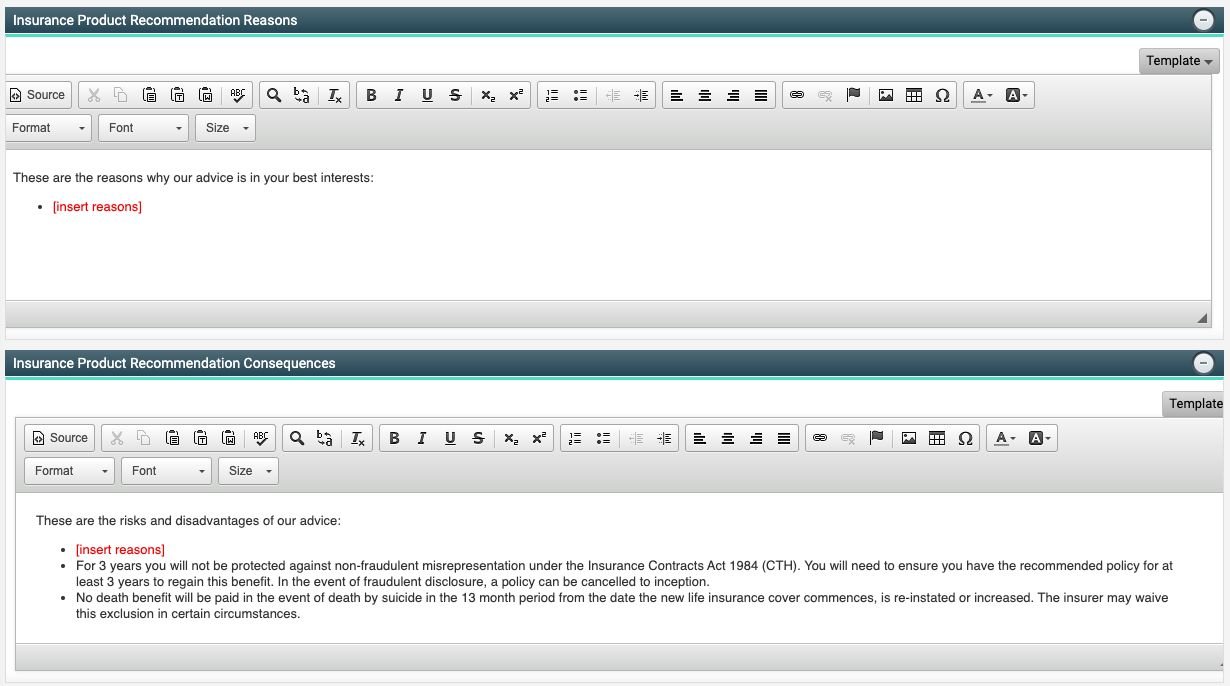
Insurance Product Recommendations Reasons
Enter the reasons and consequences for your recommendation into the free form text fields supplied. Select Template to choose from content from your document library.
–
Better Position Statement

If you elected to include the better position statement section, you will be asked to provide input into this area.
Click Add to begin
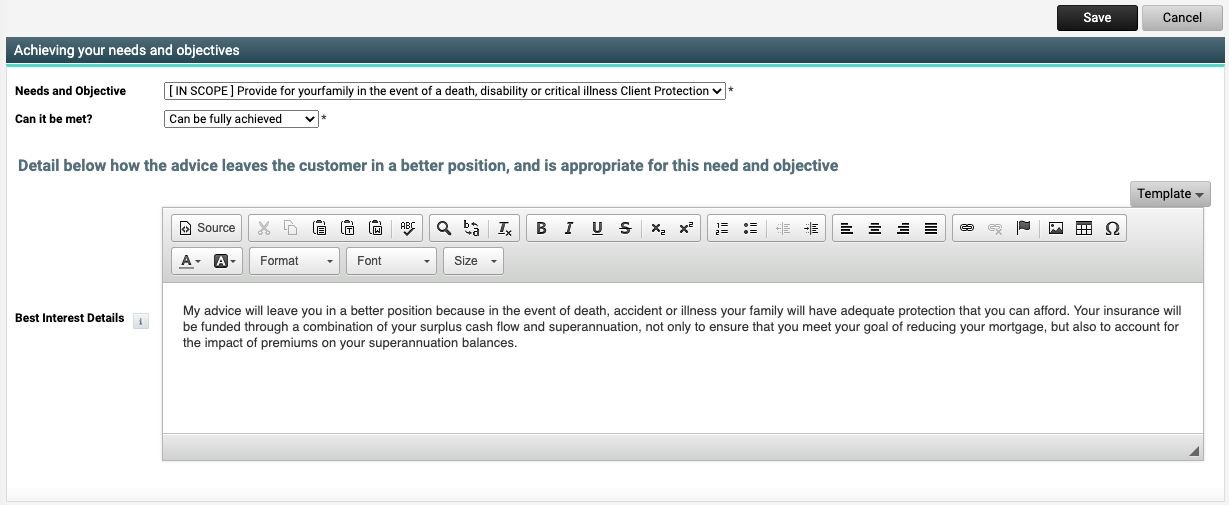
Needs and Objectives: Select an in scope objective from the list
Can it be met? Answer the questions with one of the following choices. Can be fully achieved, Can be partially achieved, Cannot be achieved.
Best Intest Details: Enter your best interest detail content here or select from your document library by clicking Template.
Continue this process until all objectives have been linked to a better position statement.
–
Alternative Strategies & Products
In this section, enter details of any alternative strategies that were considered, and the reasons why they were dismissed. You can also source additional content from your document library by selecting Template.
Alternative Products
Here, enter any alternative investment and or insurance products that were considered and the reasons why they were dismissed in relation to achieving your client’s needs and objectives. You can also source additional content from your document library by selecting Template.
–
Ongoing service
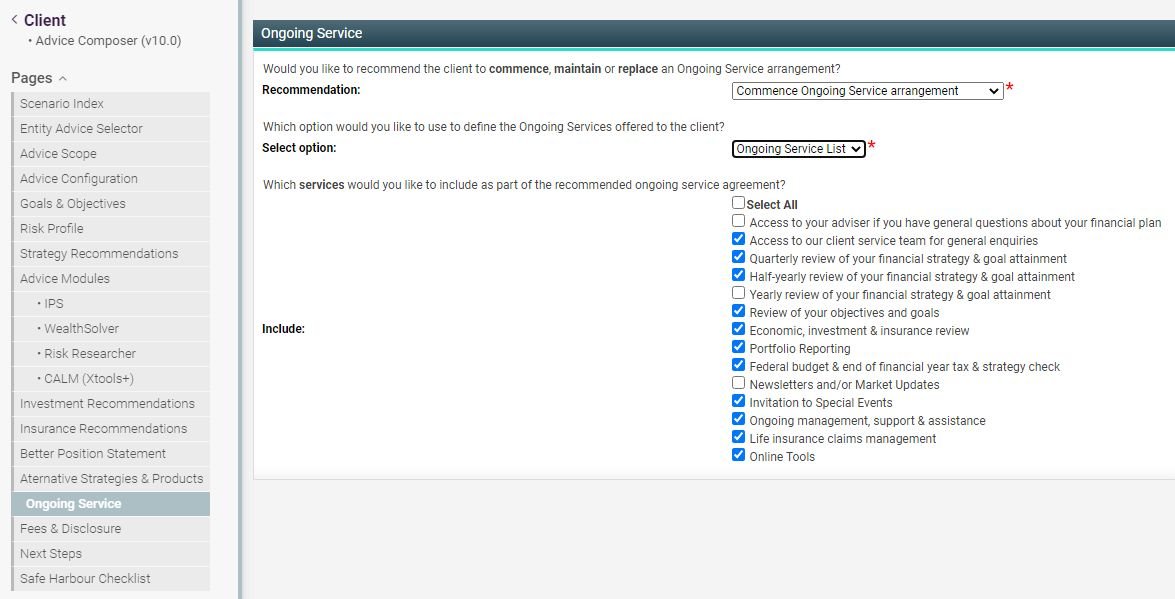
Recommendation: Select the type of ongoing service arrangement you are recommending to the client
Ongoing services: Select from the list the services client will be entitled to receive as part of the ongoing service agreement.
Your list of services may have been customised and may look different to the example above.
Alternatively you may choose to drive the service packages from the client category.
–
Fees and disclosures
Advice fees (non-product)
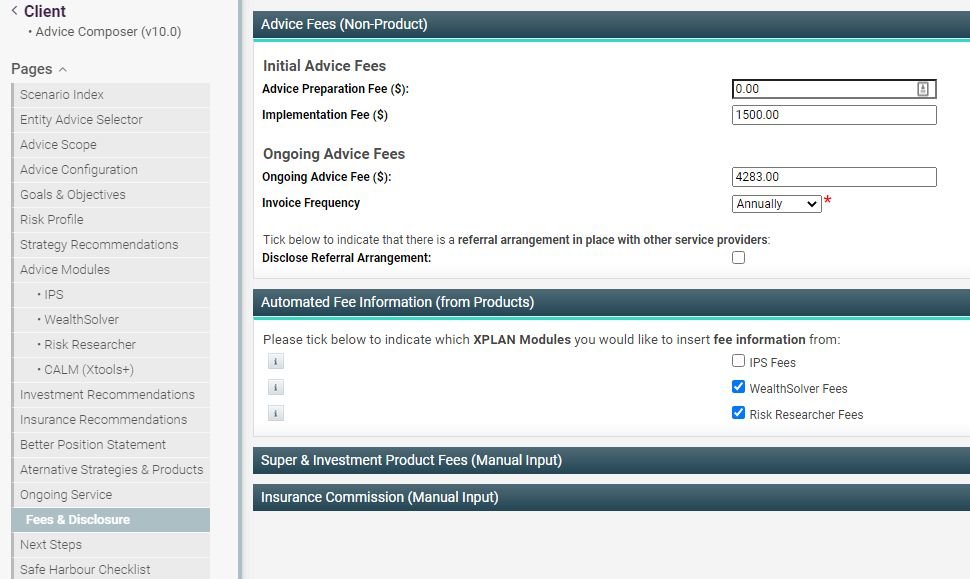
Initial advice fees: Enter the Advice preparation fee and implementation fee where applicable
Ongoing advice fees: Enter the Ongoing advice fee and frequency where applicable
Disclosure referral arrangement: Tick on if there is a referral arrangement in place with other service providers
Automated fee information (product)
Automated fee information: If your product recommendation is contained within an XPLAN module scenario then this section allows you to select whether to include a product fee table or commissions table in the Disclosure section of your SoA. These will only display if you have an active license to
1 – IPS (for product fee table)
2 – WealthSolver (for product fee table)
3 – Risk Researcher (for commissions table) and
4 – Have created modelling scenarios within each
5 – Have linked that scenarios to this SoA
Product fee information (manual input)
Super and investment product fees: Click Add button and enter advice & product fees where applicable
Insurance commission: Click Add button and enter insurance commission where applicable
–
Action plan
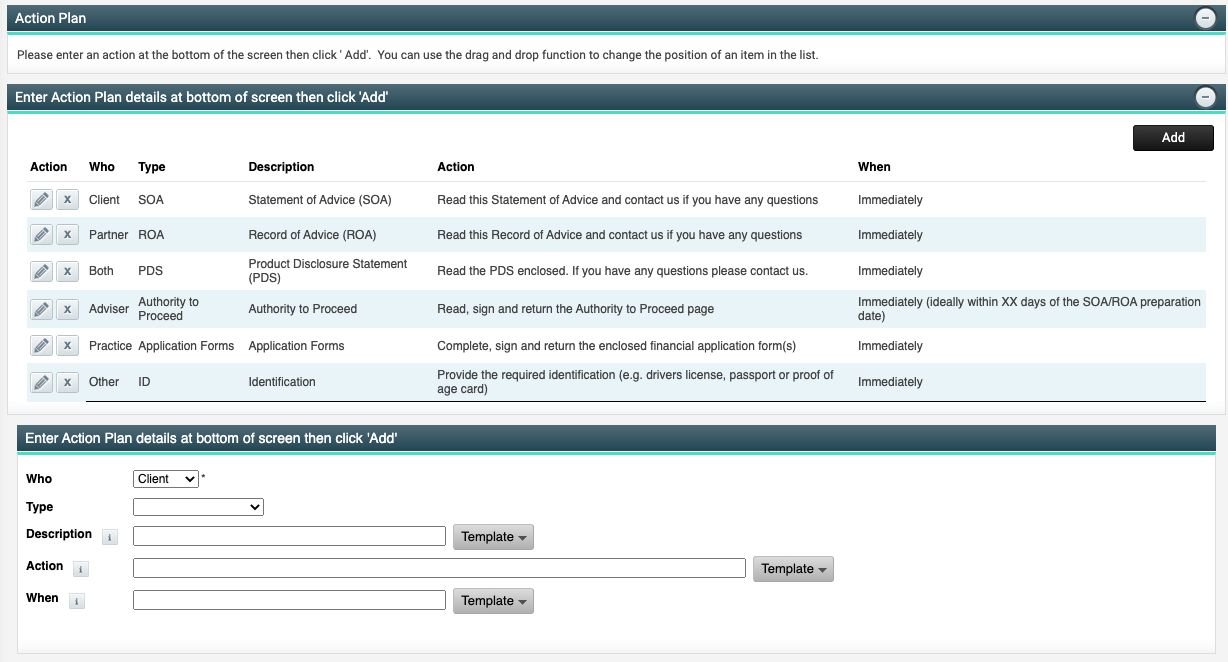
The action plan page allows you to create an action plan to give your clients. Taylor it to suit your clients particular actions.
To add items to the action plan, select from the following and key the data in, or if you have preprogrammed some data in your document library, selecting it by using the Template button.
Who: Select from Client, Partner, Both, Adviser, Practice, Other
Type: Select from SoA, RoA, PDS, Authority to Proceed, Application Forms, Fees and Payments, ID, Ask Questions and Other
Description: Enter the description needed or click Template and load from library. Then click Add
Action: Enter the action needed or click Template and load from library. Then click Add
When: Enter the content needed or click Template and load from library. Then click Add
–
Safe harbour checklist
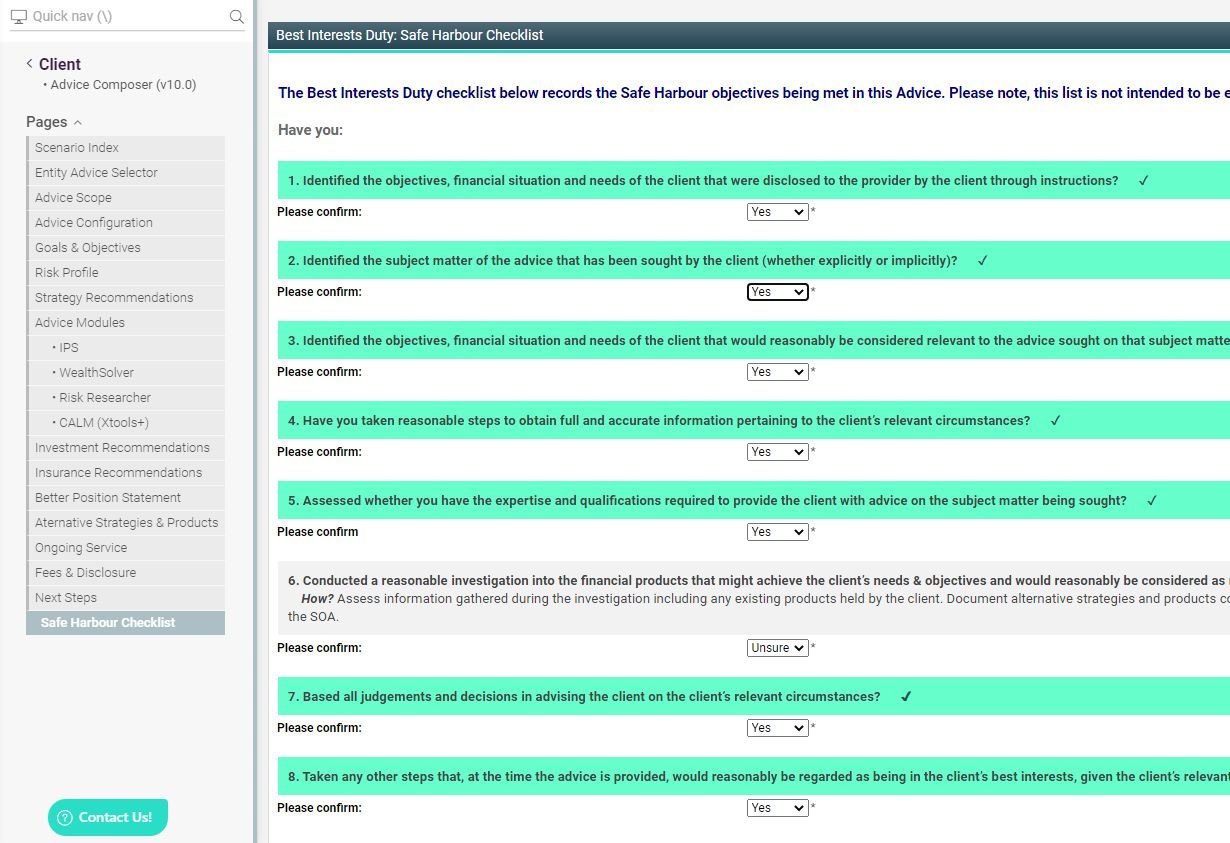
Best Interest Duty: You must act in the best interests of the client in relation to the advice.
Safe Harbour: You will satisfy the Best Interest duty, if you are able to confirm every statement listed on screen.
–
Generating the advice document
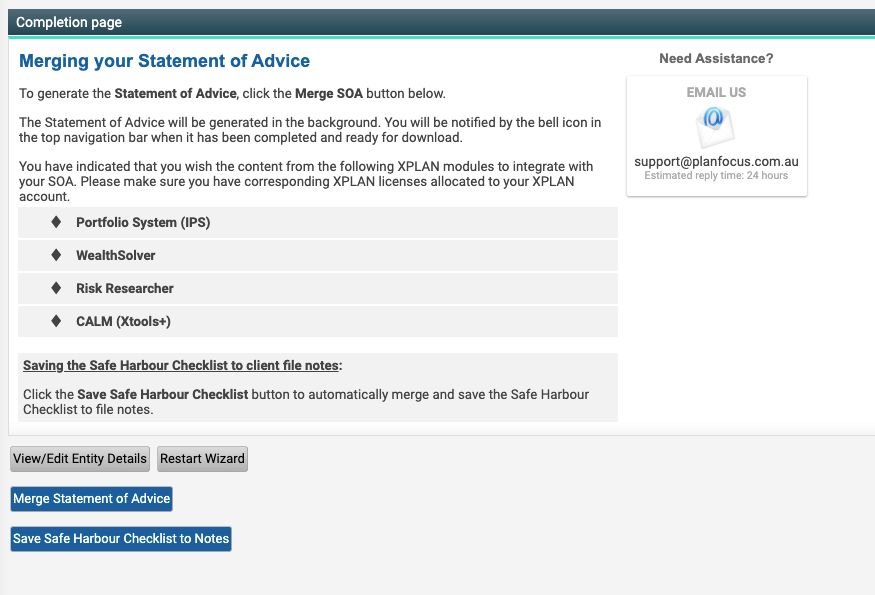
Click Merge SOA button to generate the Statement of Advice.
Click Save Safe Harbour Checklist to Notes to save a copy of the Safe Harbour test to a client file note.
If you need assistance with generating your advice or if you have any enquiries, feel free to send your query through to support@planfocus.com.au
–
Troubleshooting
How to customise the table of content
By default Composer is designed to display the first level header reference in the table of contents. However if you find that the table of contents display more than the first level or at a contrary you wish to display second and third level as well please follow those simple instructions to customise the way it appears:
1 – Please Select All (Ctrl+A), then Update (Press F9) to update the table of contents and ensure pages are referenced correctly. Please use “Entire Table”
2 – To show only first level header reference, right click anywhere on the Table of Contents and select “Edit Fields”
3 – Make sure that in the Field Names list, “TOC” is selected otherwise select “TOC” in the list.
4 – Then click on Table of Contents button to set table of contents options
5 – Set “Show Levels” to 1 then click OK
6 – Done
